Supporting imagery
Models
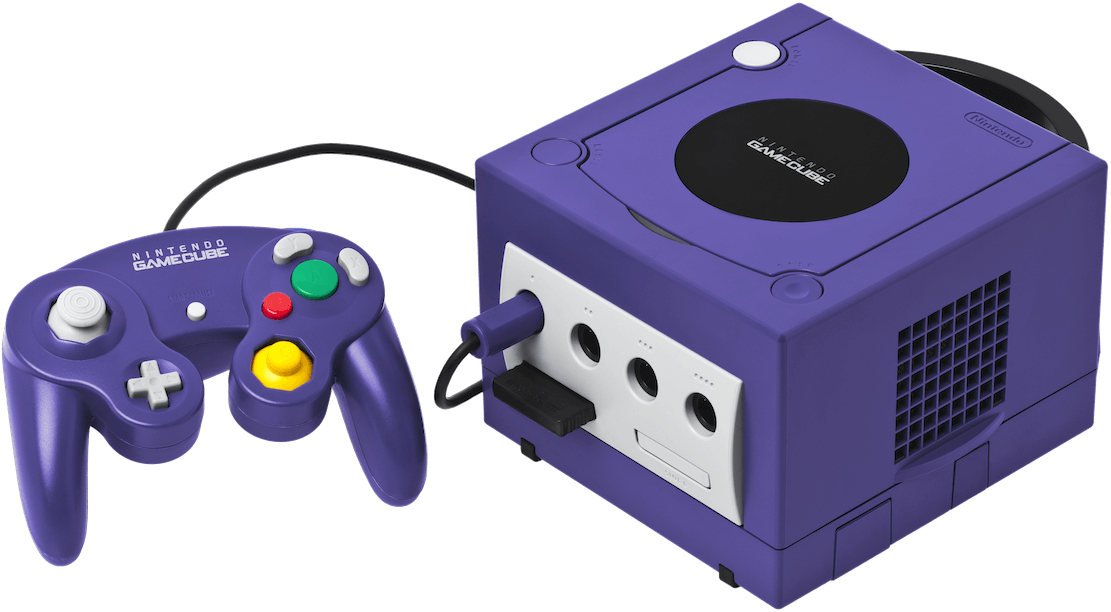
Released on 14/09/2001 in Japan, 18/11/2001 in America and 03/05/2002 in Europe.
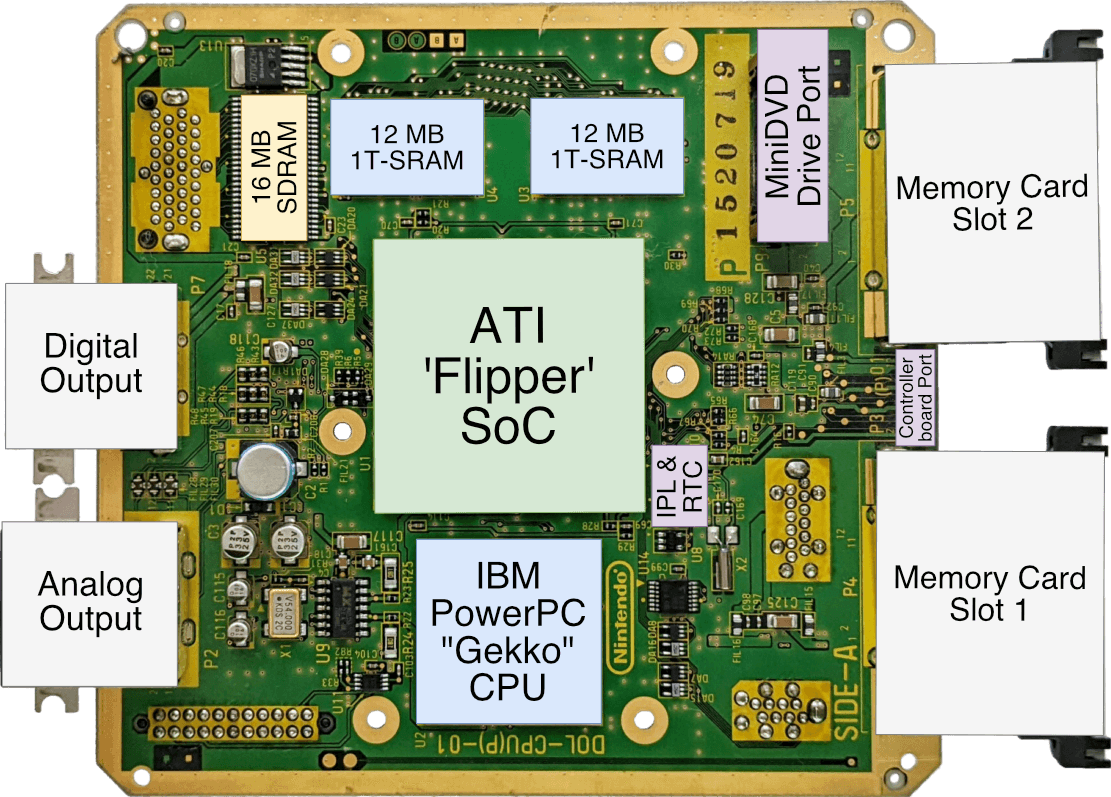
Motherboard
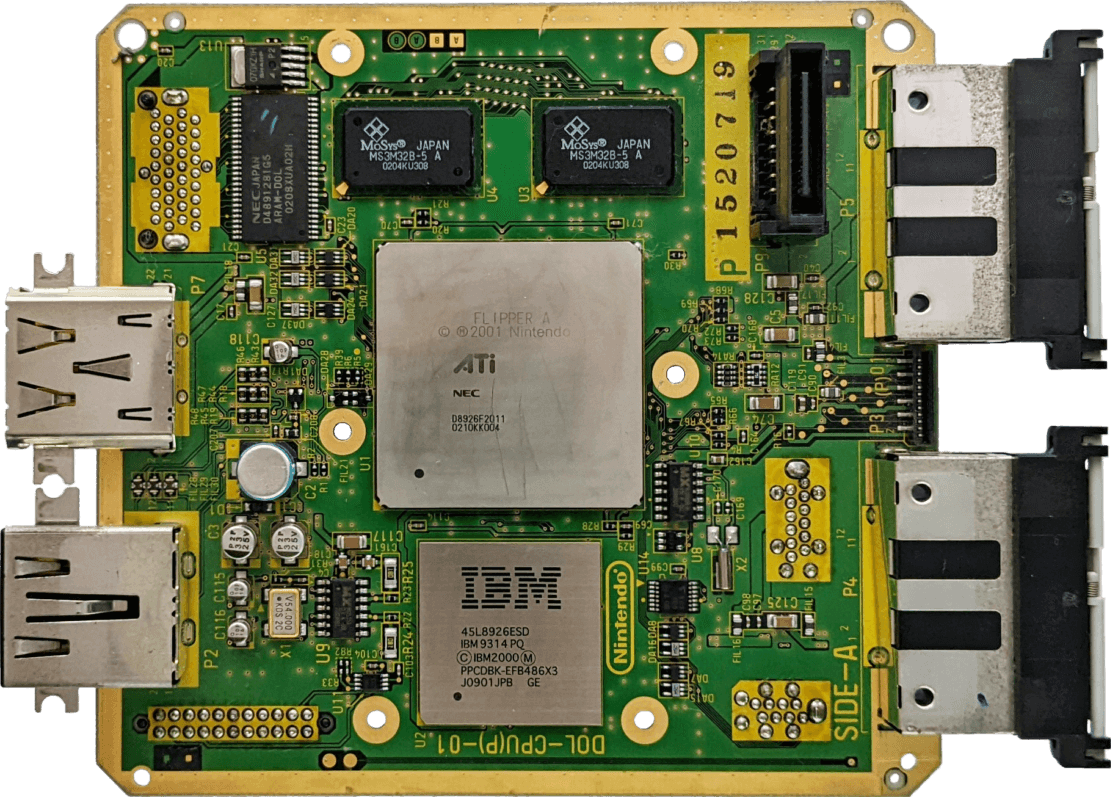
Taken from my 'DOL-CPU(P)-01' model, later ones removed Serial Port 2 and Digital Output. Encoder chip, expansion, controller and PSU slots are found on the other side.
Diagram
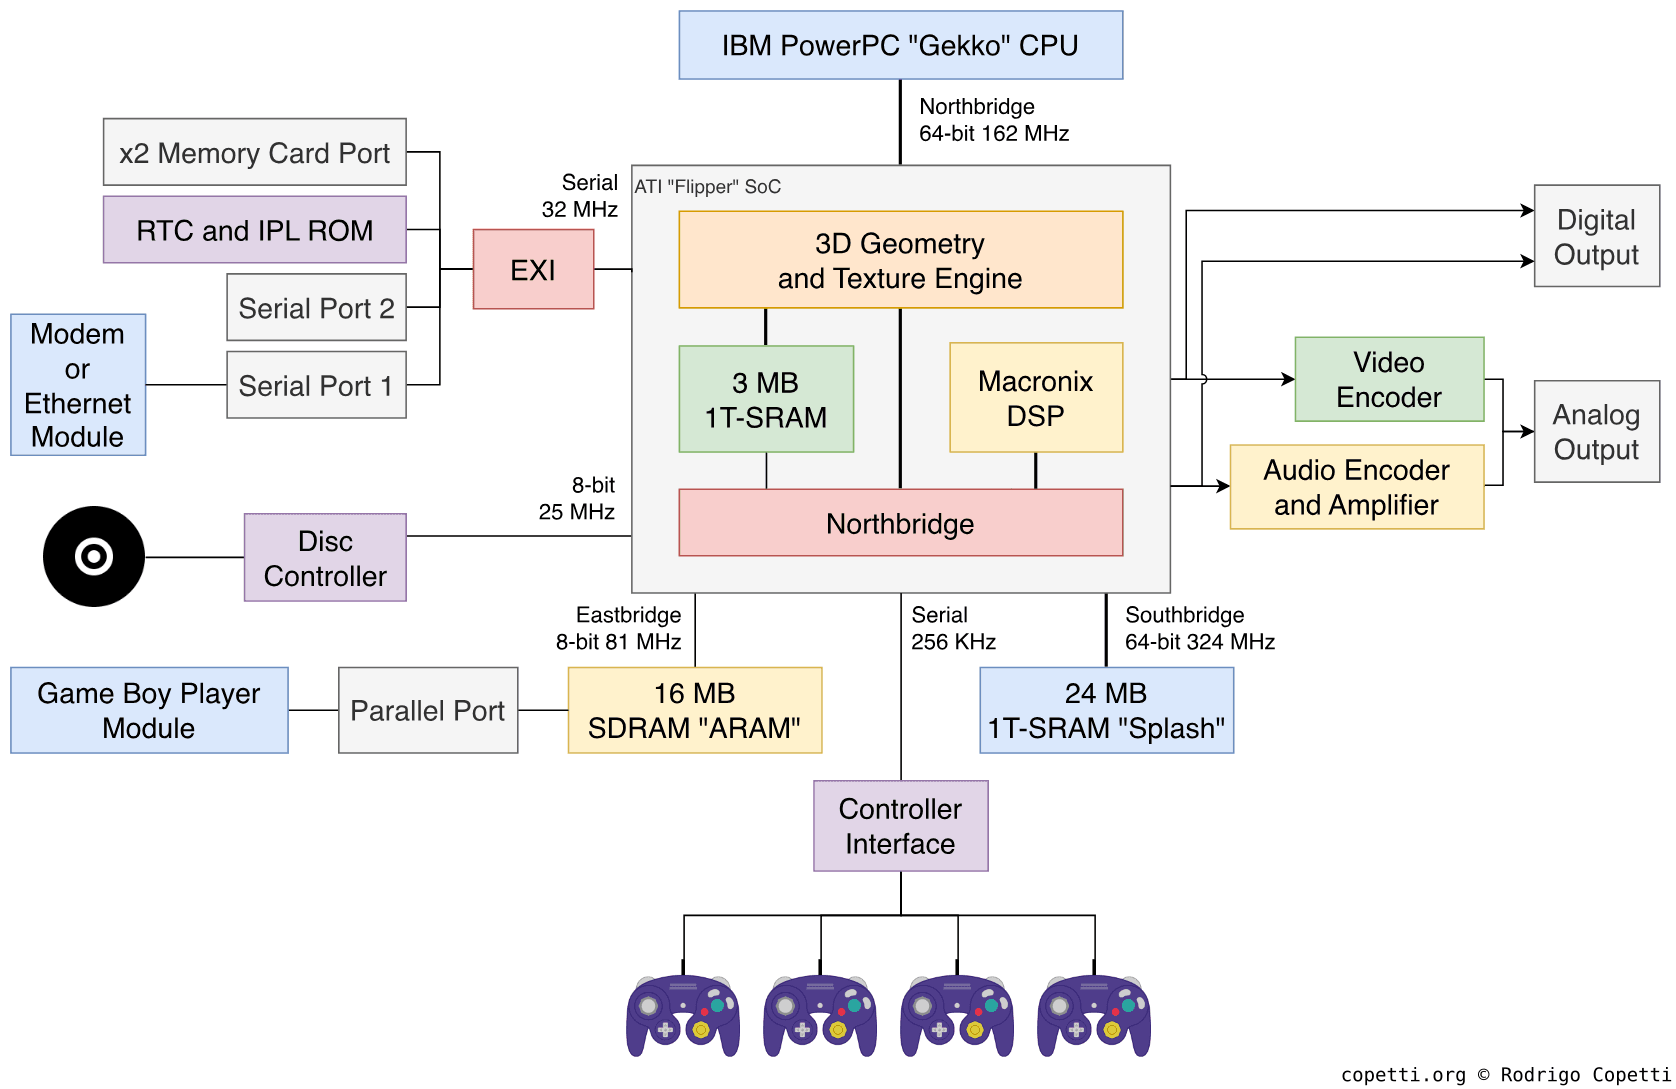
Each data bus is labelled with its width.
A quick introduction
Gone are the days of ‘3D-attempts’, Nintendo’s new offering consists of a clean and powerful break from its predecessor that will open the door to new, original and unseen content.
It’s worth pointing out that the design of this architecture led to one of the most compact hardware of this generation. This was emphasised by the lack of slims or lite revisions.
CPU
After the loss of SGI’s dominance in the graphics market, Nintendo needed new players to partner up with.
A promising candidate seems to be IBM: Apart from their famous work on mainframes, they recently joined forces with Motorola and Apple to create a CPU powerful enough to compete with Intel’s ruling in the PC market. The resulting product is a series of processors carrying the name PowerPC, which were selected to power 99% of Apple’s Macintoshes, IBM’s workstations and some embedded systems.
To understand what this means for the GameCube, let’s first take a look at the chain of innovation that culminated in the PowerPC CPU.
The origins of PowerPC
IBM was one of the three early forces pushing for the emerging RISC CPU design into the mainstream market. During the 80s, while Berkeley was busy developing the ‘RISC CPU’ and Stanford academics just founded MIPS, IBM had already produced the 801 and ROMP CPUs. These were ground-breaking yet commercially-unsuccessful silicon implementing a set of guidelines later known as the ‘RISC model’ [1].
The commercial milestone
Entering the 90s, IBM tried again with a new series of UNIX workstations called ‘IBM RS/6000’, and within it, a new in-house RISC CPU: POWER1. With a focus on instruction-level parallelism, the latter featured attractive advancements such as [2]:
- A complete 32-bit instruction set called POWER.
- A 64-bit floating-point unit.
- A Harvard cache architecture, this segregates data and instruction space to increase bandwidth.
- The ability to execute two instructions at the same time by distributing them across its three separate units (branch, fixed-point and floating-point). Hence, POWER1 is recognised as being two-way superscalar.
- Static branch prediction, which turns control hazards into opportunities for accelerating execution.
- Out-of-order execution of floating-point operations, through register renaming [3]. All in all, this greatly increments the amount of instructions the CPU executes per time (and takes care of data hazards).
- The core design originates from IBM’s mainframe era, when it was published as Tomasulo’s algorithm and subsequently implemented on the IBM System/360 (1966). With POWER1, IBM managed to bring part of it to workstation equipment.
Nevertheless, the POWER1 CPU was a large and expensive package comprised of multiple chips. So, for their follow-up venture, IBM shrank down its design to fit in a single chip. While still POWER-compliant, this came at the cost of housing a 32-bit FPU, a von Neumann cache architecture and reverting to in-order execution. The new chip was called RISC Single Chip (or ‘RSC’) and shipped with the low-end line of their RS/6000 workstations.
Reaching the average user
In the midsts of these developments, IBM also agreed to join forces with Apple and Motorola to tackle the Intel-Microsoft monopoly in the desktop market, forming the AIM alliance. Thus, a new project was conceived for a competitive CPU in the low-end arena. This would be made of intellectual property from the three companies, including:
- IBM’s RSC processor design.
- Motorola’s bus architecture (found in their in-house RISC processor, the Motorola 88110).
- Apple and Motorola’s knowledge of the end-user’s needs.
Keith Diefendorff, a member of the Motorola 88110 team, was recruited as the lead architect and, in 1993, the project culminated in the following:
- The PowerPC instruction set: A subset of POWER, with additional instructions for multiplication, support for a symmetric multiprocessor setup and an optional 64-bit mode.
- From then on, IBM’s POWER CPU line would implement the PowerPC ISA instead. This was first apparent with the release of POWER3 in 1998, a high-performance CPU implementing the 64-bit specification of PowerPC.
- We won’t see a symmetric multiprocessor setup in this article series until the Xbox 360 and Wii U arrive.
- The PowerPC CPU, a new line of desktop CPUs implementing the PowerPC ISA, starting with the PowerPC 601. This was a cost-effective version of the RSC microarchitecture.
- Motorola also dropped the development of the 88000 CPU altogether to focus on this new series.
Popularising the PowerPC
To make sure the new line would be both technically competitive and commercially viable, the PowerPC 601 attempted to bring certain advancements of instruction parallelism to the masses, to name a few [4]:
- The implementation of both POWER and PowerPC ISAs, to assist POWER developers in transitioning to PowerPC.
- Three-way superscalar execution using three separate execution units (FPU, branch and ALU) [5]. An improvement from previous designs.
- Based on Motorola’s model, a new bus design called Bus Interface Unit, providing:
- A 64-bit data bus and a 32-bit address bus, the former is critical for taking advantage of the superscalar capabilities.
- Burst transactions, enabling to transfer 32 Bytes of memory (the size of L1 cache) with a single instruction [6].
- Memory Management Unit (MMU), offering virtual memory in the same package.
For the end user, this new CPU would now be found in IBM’s low-end RS/6000 series and in Apple’s new line of Macintosh computers called ‘Power Macintosh’.
Contemporary work
The PowerPC 601 was meant to kickstart momentum for the PowerPC line, but the following years saw turbulent changes in the microarchitecture.
Individual developments
Once the 601 shipped, Motorola and IBM decided to separately work on the follow-up generation. This would be a pure PowerPC implementation (removing traces of the POWER ISA) materialising as two separate product lines [7]:
- The low-end PowerPC 603, headed by Motorola, was designed for the portable market. In doing so, it delivered a smaller L1 cache (now based on the Harvard architecture), two additional execution units and no multiprocessor support. The design decisions resulted in an overall consumption rate of 1.8-2.0 Watts [8].
- The high-end PowerPC 604 headed by IBM. In exchange for a premium price and high power consumption (14.5-18.5 Watts), it provided advanced parallelism capabilities (à la MIPS), such as 4-issue execution, the return of out-of-order execution, dynamic branch prediction and multiprocessor support [9].
Even though the 603 should’ve shined for its power efficiently, existing business applications ended up eclipsing its novelties. For instance, Apple’s software architecture was still relying on emulating 68000 instructions, which bottlenecked the 603’s small cache size.
As a side note, IBM also developed the PowerPC 4xx series, conceived as a microcontroller solution instead of a desktop CPU [10]. They bundle small cache and skip sophisticated modules such as the MMU and FPU. However, their variants were offered as a customisable package to tailor it to the manufacturer’s needs. That being said, while the 4xx is not of particular interest for this article, a famous competitor did adopt it for secondary tasks.
Joining forces again
Ultimately, the second generation of desktop PowerPC chips was deemed either too expensive or downright uncompetitive against Intel. Thus, Apple got IBM and Motorola to collaborate again in a new unified generation that brought out the best of both worlds. The energy-efficient 603 was chosen as the foundation for the new design. To improve upon this basis, certain decisions were taken:
- Addressing its limitations by providing larger cache and higher memory bandwidth.
- Incorporating design ideas of the 604, such as dynamic branch prediction and out-of-order execution (limited to memory operations, for now).
- Implementing new enhancements, such as an extra ALU for greater parallelism.
This became the 750 line, popularised by Apple as the PowerPC G3. From then on, IBM and Motorola continued working on variants and enhancements of the 750. These focused on greater clock speeds, larger cache and smaller fabrication process.
Interestingly, it’s always the most energy-efficient CPUs that manage to weather development turmoil, as others (MIPS, Intel and ARM) will later corroborate.
The band splits for good
As time passed, the three companies became increasingly distant. Two years after the PowerPC G3 was unveiled, Motorola delivered by itself a new line called the 7400 (which Apple named the G4). This featured a 64-bit FPU, a faster bus architecture called ‘MPX’ and a set of SIMD instructions called ‘Altivec’. Despite its popularity in the desktop market (thanks to Apple), IBM only devoted attention to its exclusive POWER CPU line.
Years later, in 2003, Motorola finally gave up on the CPU business and divested its semiconductor division, leading to the incorporation of ‘Freescale’. The latter wasn’t interested in working on PowerPC chips either, and so the AIM alliance came to an end. Be as it may, Apple still needed new CPUs, so IBM continued the line of succession by grabbing its POWER4 design and scaling it down, leading to the PowerPC 970 CPU (also called the ‘G5’).
And this is where the history section ends. Thus, it’s time to take a look at the GameCube’s unique CPU (which sits between the 750/G3 and the 7400/G4). Now, I’ll be focusing on the GameCube hardware from now on, but if this detour got your attention, you may want to read the PlayStation 3, Xbox 360 and Wii U studies next.
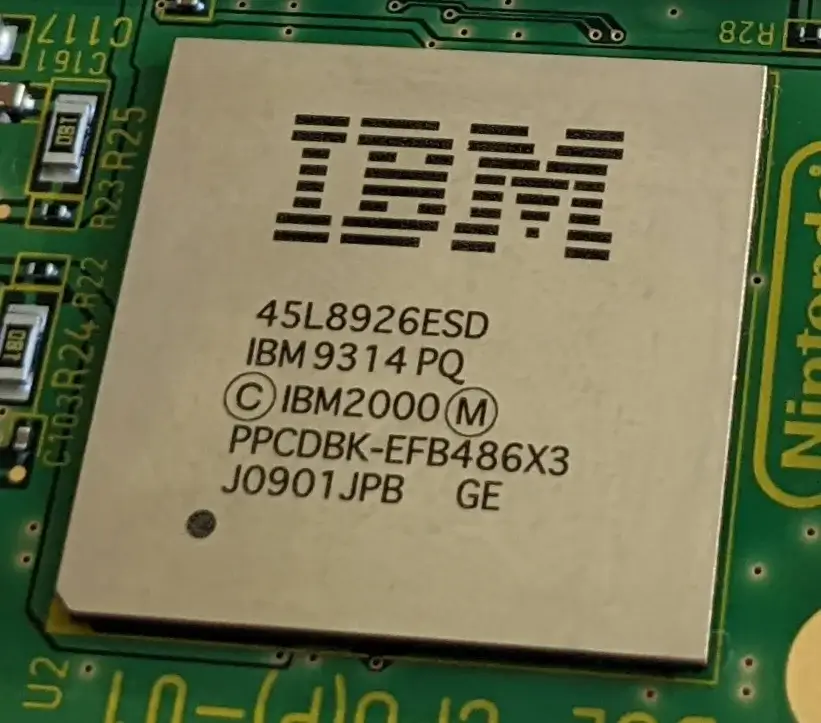
The PowerPC Gekko
Back to the year 2001, Nintendo required something powerful but cheap. So, to comply with those red lines, IBM grabbed one of its past designs, an enhanced G3 called the PowerPC 750CXe (found on the late iMac G3, known as the Early-Summer 2001), and beefed it up with capabilities that would please game developers. The result was the PowerPC Gekko and runs at 486 MHz.
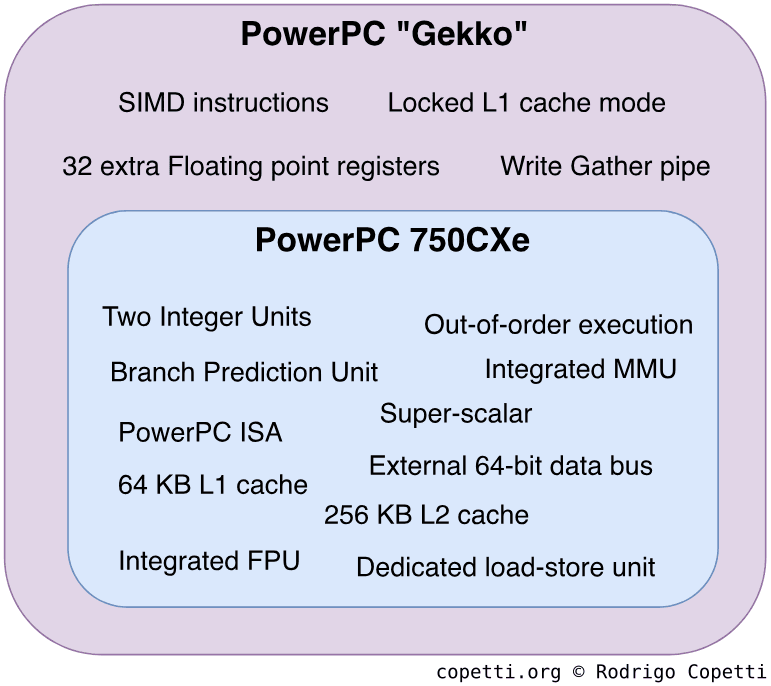
Let’s find out what makes Gekko so special, and to do that we need to first look at the offerings of the 750CXe. Now, having gone through the history of PowerPC, you may find that a lot this information overlaps with previous designs (that’s the point of these studies!). That being said, the 750CXe offers [11]:
- The PowerPC ISA: This comes as no surprise. The only additional information is that the 750CXe implements the v1.10 specification.
- External 64-bit data bus: As you’ve seen before, while the ISA can fit in a 32-bit bus, we still need to move wider chunks of data without hitting performance penalties.
- Triple-issue superscalar: If the required units are available, the CPU may process up to two instructions at the same stage of the pipeline. In the case the queue includes a branching instruction, the number of possible concurrent instructions is raised to three.
- Out-of-order execution: The CPU can re-order the sequence of instructions to keep all of its units working, thus increasing efficiency and performance.
- Two Integer Units: Combined with the superscalar and out-of-order model, it increments the number of integer operations done per unit of time.
- Integrated FPU with 32-bit and 64-bit registers: Accelerates operations with floats and doubles.
- Four-stage pipeline (with bonus): Here is a previous introduction to instruction pipelining. In the 750CXe, FPU operations are divided into three more stages (7 stages in total) while load-store operations are divided into two (5 stages in total).
- All in all, this increments the instruction throughput without getting out of hand.
Additionally, this CPU also includes dedicated units to speed up specific computations [12]:
- Branch Prediction Unit: Whenever there is a condition that needs to be evaluated (which would decide if the CPU should follow path ‘A’ or path ‘B’), the CPU will instead follow one of the paths based on previous executions and then evaluate the condition. If the prediction happens to be right then the CPU will have saved some time, if not, it will reverse and follow the correct path.
- Dedicated load-store unit: Separates the units that manipulate registers and the ones handling main memory.
- Integrated Memory Management Unit: Interfaces all memory access from the CPU.
- Previous consoles included this component as another co-processor, the MMU is now found inside the same chip, reducing manufacturing costs.
And, of course, some cache is also included to speed up memory bandwidth:
- 64 KB L1 cache: Divided into 32 KB for instructions and 32 KB for data.
- 256 KB L2 cache: It can be filled with instructions and data, which greatly improves bandwidth.
IBM’s enhancements
While the previous lists of features are very appreciated (compared to previous generations), this CPU still falls behind others on gaming performance (let’s not forget that this is still a general-purpose CPU, good at spreadsheets but average at physics). To compensate, IBM added the following tweaks that will constitute Gekko [13]:
- Enhanced instruction set with 50 new SIMD instructions: These operate two 32-bit floating-point numbers or one 64-bit floating-point number using only one cycle. Consequently, the new SIMD instructions will speed up vector calculations, particularly useful during geometry transformations.
- 32 floating-point registers: These come with the new SIMD instructions.
- Write Gather pipe: A special memory writing mechanism available to use. If enabled, instead of performing single-beat transfers, it holds all memory write requests in a 128-byte buffer until it’s 25% full, then performs the requested writes using a technique called burst transaction which can move blocks of 32 bytes of data at once.
- As you can imagine, this saves a lot of bandwidth by making full utilisation of the available buses.
- Locked L1 cache: Programs can take away 16 KB of L1 data cache to use as ‘scratchpad’ (incredibly fast memory).
Apart from handling the game logic (physics, collisions, etc), these enhancements will allow the CPU to implement parts of the graphics pipeline (geometry transformations, lighting, etc) with acceptable performance. This is very important since the GPU can only accelerate a limited set of operations, so the end result is not conditioned by the GPU’s limitations.
A step forward or a step backwards?
On your Nintendo 64 article, you explained that the system has a 64-bit CPU, but the GameCube one is 32-bit. Did Nintendo downgrade their console?
Indeed Gekko implements a 32-bit PowerPC specification, while the MIPS R4300i can switch between 32-bit and 64-bit modes. To answer whether this is an improvement or not, you have to ask yourself: Why would you need ‘64-bitness’?
- To address more than 4 GB of memory → The GameCube doesn’t have near that amount of memory locations, so this is not a requirement.
- To operate larger chunks of data using fewer cycles and bandwidth → That’s covered by Gekko’s new SIMD instructions, the 64-bit FPU and data bus; and the write-gather pipe.
- To come up with more advertising terms → Yeah… I don’t think that persuades people anymore.
As you can see, the GameCube already enjoys the advantages of 64-bit systems without being called a ‘64-bit console’. This is why you and I can’t summarise two complex machines by their ‘number of bits’.
Clever memory system
During the design of the next-gen architecture, Nintendo’s architects performed a post-mortem analysis of their previous design and discovered that using a Unified Memory architecture together with some high-latency components (RDRAM) resulted in one of the biggest causes of bottlenecks (almost 50% of CPU cycles were wasted while idling) [14]. Moreover, the inclusion of multiple independent units contributed to a concerning competition for the memory bus.
For that reason the GameCube’s architects came up with a new memory system strictly based on providing dedicated memory space and using low-latency chips. With the new design, GPU and CPU will no longer compete for the same RAM (causing fill-rate issues) since the GPU will now have its own internal and amazingly fast memory. On the other side, the GPU will still be in charge of arbitrating access to I/O too.
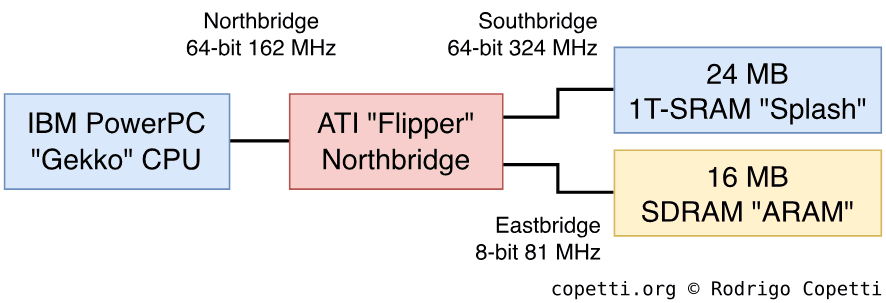
The result was a system organised with two main buses:
- The Northbridge: It’s 64-bit wide and connects the CPU with the GPU. It runs 3 times slower than the CPU clock, so tasks will have to be optimised to not rely so much on the GPU. Other components like the DMA and cache may come in handy.
- The Southbridge: It’s also 64-bit wide and connects the GPU with 24 MB of 1T-SRAM called ‘Splash’. This type of RAM is made of DRAM (which is the most popular type but also cheaper and slower) however it’s enhanced with extra circuitry to behave like SRAM (faster and expensive, mostly used for cache). The bus is twice as fast as the GPU, possibly to enable the GPU to provide a steady bandwidth between the CPU and main memory.
Additionally, this design contains an additional (yet unusual) bus where more memory can be found:
- The Eastbridge: It connects the GPU with another memory chip called Audio RAM or ‘ARAM’ [15]. It provides 16 MB of SRAM available for general purposes, which is pretty big for spare memory. However, the bus is not accessible through normal means (memory addresses). Instead, it’s connected to an 8-bit serial endpoint (clocked two times slower than the GPU and four times slower than the CPU), which is only accessible through DMA.
Overall, this means that while ARAM provides a considerable amount of RAM, it will be limited to less critical tasks, like acting as an audio buffer or being used by certain accessories (explained in the I/O section).
Making the most of ARAM
So far, we’ve seen that, on paper, the memory capabilities are undoubtedly superior to its predecessor, but there’s still room for improvement. For instance, Nintendo could’ve fitted more hardware to incorporate ARAM into the CPU’s memory map.
On a related note, let’s revisit the MMU used in Gekko. The CPU, with its 32-bit address bus, can access up to 4 GB of memory, but the system houses nowhere near that quantity. So, to prevent exposing unpopulated (and unpredictable) memory addresses, ‘virtual memory’ addressing is activated by default to mask physical addresses with a safer, easily-cacheable and continuous ‘virtual’ address map [16].
To make this work, Gekko (and other PowerPC architectures) translate virtual addresses to physical ones with the following process:
- Perform Block Address Translation (BAT): There are eight pairs of programmable registers (four for data and four for instructions) where each pair map a range of virtual address to a continuous range of physical addresses. The MMU attempts to find the physical address if it’s found within those ranges.
- If BAT didn’t work, read the Page Table: The MMU also stores a table that catalogues the physical location of pages (block of virtual addresses).
- The MMU can take time to read a page table, so a Translation look-aside buffer (TLB) is included to cache recent reads.
- Other architectures such as x86 or MIPS provide paging as well, though not all of them will offer a TLB.
- Finally, if the requested virtual address can’t still be translated, then the MMU triggers a ‘page fault’ exception in the CPU and lets the operating system decide what to do next.
So what use does this have for developers? Well, it turns out Nintendo released some libraries that extend main RAM using ARAM with the help of paging. To recap, ARAM is not addressable, but the CPU may call DMA to fetch and store data from there. Thus, the CPU can move pages out of main RAM to make room for other resources and temporarily store them in ARAM. Afterwards, whenever a page fault occurs, the OS contains routines to look for the missing pages in ARAM and restore them to their original location in main RAM.
In conclusion, with some clever tricks, these general-purpose capabilities enabled GameCube games to enjoy more memory than technically allowed, thereby reaching higher levels of quality. However, it’s important to bear in mind that such tricks may come with some performance penalties (especially if they’re taken for granted).
Graphics
This is one of the most critical sections of this console, it basically makes the GameCube, a GameCube.
The history of this console’s GPU has some interesting connections: Wei Yen, the director of N64’s SoC (the RCP), later founded ArtX and landed a contract with Nintendo to develop their next-gen chip: Flipper.

There were lots of advancements done from the previous iteration, for instance, the subsystem was severely simplified down to a single (but powerful) core.
During the development process, ArtX got acquired by ATI, which in turn was sold to AMD six years later. Hence, this is why you see an ATI sticker stamped on the front of the case.
Architecture and design
Flipper is a complex block that handles multiple services [17], so let’s focus on the graphics component for now (since it’s the one responsible for bringing our geometry to life). We’ll call this area the GPU or Graphics Engine and, if you’ve been reading the N64 article, just letting you know that the core is now functional out of the box, so programmers won’t need to worry about injecting code to make it work. Nevertheless, there will be some interesting parts that are customisable.
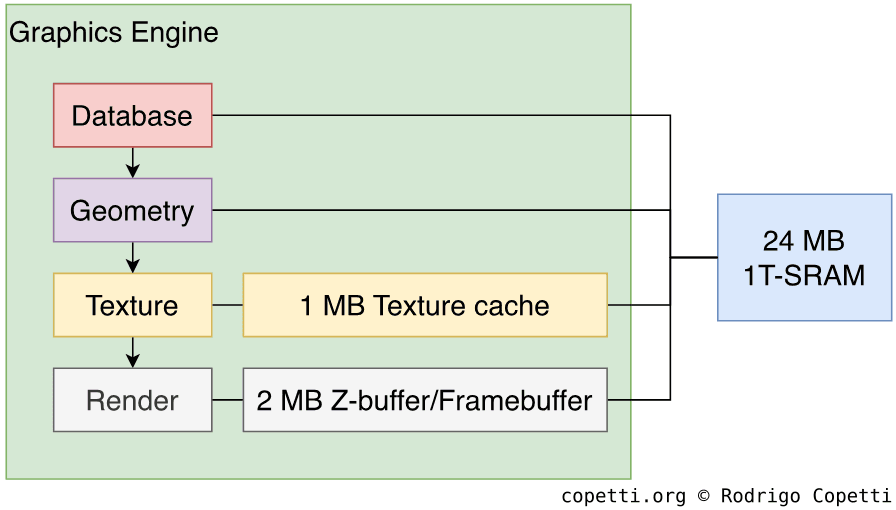
As always, in order to draw a frame on the screen, our data will be pumped through the GPU’s pipeline. Data goes through lots of different components which we can group into four stages:
Database
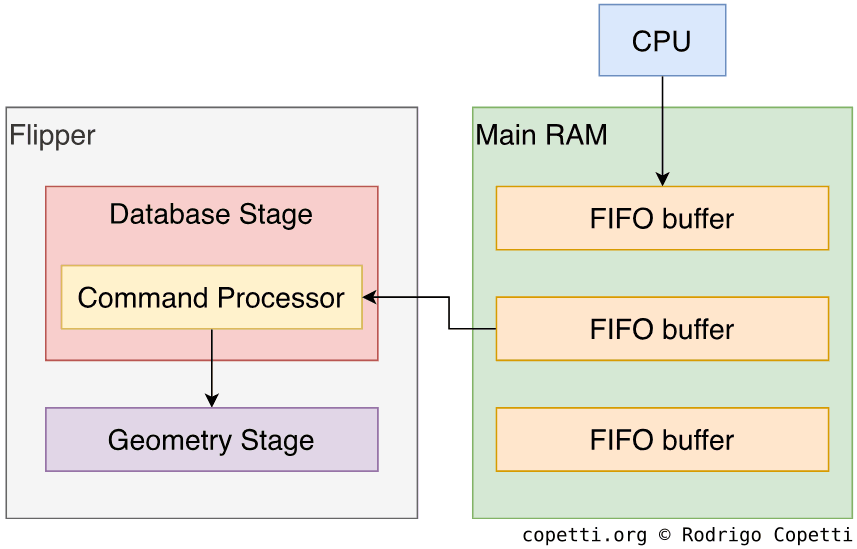
The CPU and GPU communicate to each other using a fixed-length FIFO buffer in main RAM, this is a reserved portion where the CPU will write drawing commands that the GPU will read (and eventually display), this functionality is natively supported by the CPU and GPU.
Furthermore, the CPU and GPU don’t have to be pointing at the same FIFO at the same time, so the CPU can fill a separate one while the GPU is reading the first one [18]. This prevents idling.
Issuing individual commands to construct our geometry can get very tedious with complex scenes, so official libraries included tools that generated the required Display Lists (pre-compiled set FIFO commands) from the game’s assets, this chunk only needs to be copied to RAM to let the GPU effectively display them.
The GPU contains a command processor which is in charge of fetching commands from FIFO.
Geometry
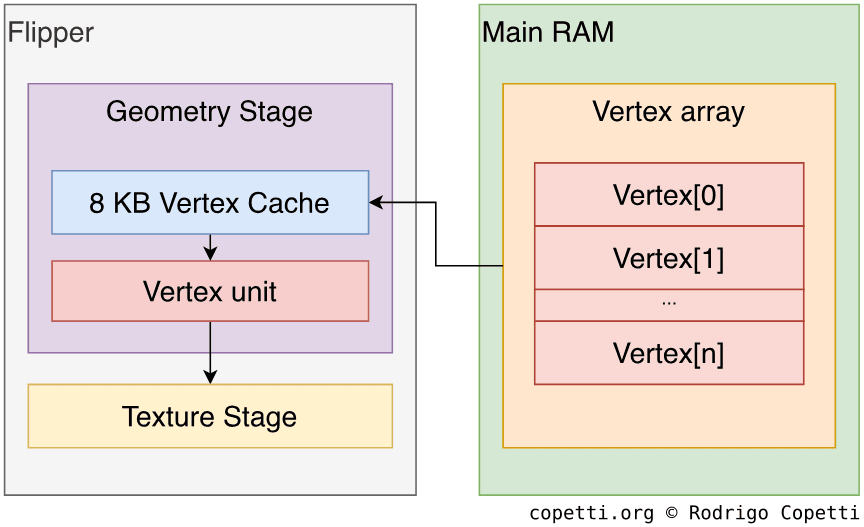
Here primitives are transformed to shape accordingly for the desired scenery and prepared for rasterising. The engine uses a dedicated Vertex unit or ‘VU’ to accomplish this.
There are two vertex modes available to handle primitives issued through FIFO:
- Direct mode: The CPU issues each FIFO entry with all required attributes (position, normal, colour, texture coordinate, or matrix index). Useful when the data is already cached.
- Indirect mode: The FIFO entry contains an index value that specifies where the attribute information is located in RAM, so the vertex unit needs to look it up by itself. This data is structured as an array, so for the VU to traverse it, each vertex entry must specify where the array starts (base pointer), how long is each entry (stride) and at which position the vertex is (index).
Once loaded, the primitives can be transformed, clipped, lighted (each vertex will have an RGB value that can also be interpolated for Gouraud Shading purposes) and finally, projected.
Texture
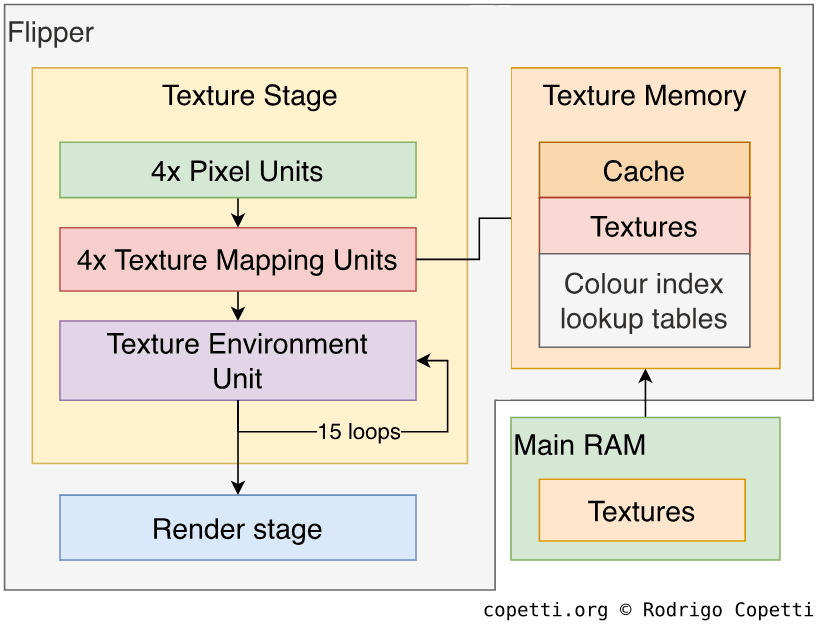
Now it’s time to apply textures and effects to our models, and for that the GPU includes multiple units which will process our pixels. Now, this is a very sophisticated (yet quite complex) procedure, so if you find it difficult to follow, just think of it as a big assembly line that processes pixels. Having said that, there are three groups of units available:
- Four parallel Pixel units (also called ‘pixel pipelines’): Rasterises our primitives (converts them to pixels). Having four units available enables to deliver up to 2x2 pixels on each cycle.
- One Texture mapping unit at the end of each Pixel unit (giving four in total): Together they process up to eight textures for our primitives (now mere pixels) at each cycle.
- It can also loop itself to merge multiple texture layers over the same primitive, this feature is called Multi-Texturing and can be used to achieve detailed textures, environment mapping (reflections) and bump mapping [19], for instance.
- Finally, the unit also provides an early z-buffer, mipmapping (processing a downsized texture instead, based on the level of detail) and anisotropic filtering (a welcoming improvement over the previous filters that provides greater detail with sloped textures).
- Texture Environment unit or ‘TEV’: A very powerful and programmable 16-stage colour blender. It basically combines multiple texels (lighting, textures and constants) to achieve an immense amount of texture effects that will be applied over our polygons.
- The unit works by receiving four texels which are then processed based on the operation requested. Afterwards, it can feed itself the resulting texels as new input, so at the next stage/cycle, the unit can perform a different type of operation over the previous result. This ‘loop’ can last up to 15 iterations.
- Each stage has 2^4 operations to choose from [20] and, considering the result can be re-processed at the next stage, there are ~5.64 × 10^511 possible permutations!
- Programmers set up the TEV at runtime (meaning it can change any time) and this is crucial since it opens the door to lots of original materials and effects.
All of this is assisted by 1 MB of Texture memory (1T-SRAM type) which can be split into cache and Scratchpad memory (fast RAM). Real-time hardware decompression for SRTC (S3 Texture Compression) textures is also available to fit more textures in that single meg. of memory available.
Render
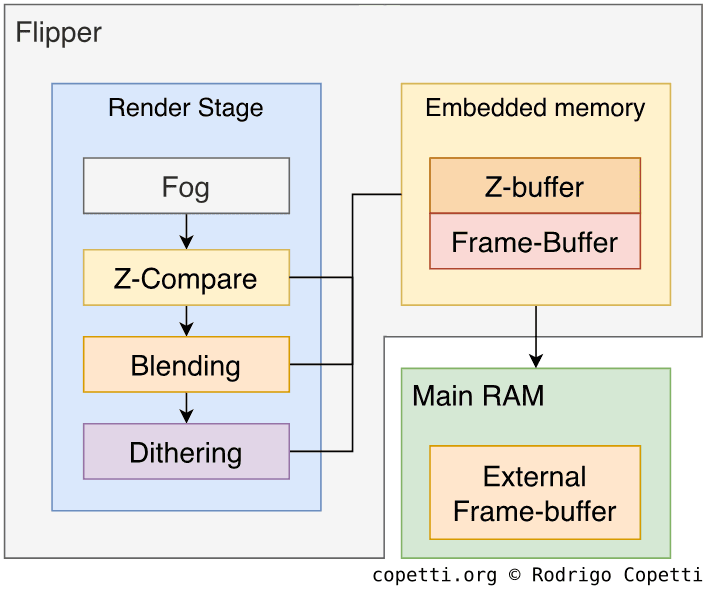
The final stage of the rendering process includes applying some optional but useful touches to our scene:
- Fog: Blends the last colour from the TEV with a fog constant colour to effectively simulate a foggy environment.
- Z-compare: A late-stage Z-buffer. The engine will use 2 MB of embedded 1T-SRAM for Z-buffering calculations.
- Blending: Combines the colours of the current frame with the previous frame buffer.
- Dithering: As the name indicates, applies dithering over our frame.
The resulting frame is finally written to the frame buffer in the embedded 1T-SRAM, but this is still locked inside Flipper (the area is called ‘Embedded Frame Buffer’ or ‘EFB’, though it also includes the z-buffer). So, to display it on our TV, we have to copy it to the External Frame-Buffer or ‘XFB’ [21], which can be picked up the Video Interface or ‘VI’. Besides, the copy process can apply effects like Antialiasing (reduces blocky edges), Deflicker (smooths sudden changes in brightness), RGB to YUV conversion (a similar format that occupies less space in memory) and Y-scaling (vertically scales the frame).
It’s worth mentioning that the XFB area can also be manipulated by the CPU, this enables it to combine previously-rendered bitmaps with our recently-rendered frame; or when certain games need to render very colour-rich frames which can’t fit in the EFB, so they are rendered in parts and merged by the CPU afterwards (always keeping in-sync with the VI).
Interactive comparison
Time to put all of this into perspective, check out how programmers evolved the designs of their previous games to take advantage of the new graphics capabilities of this console. Don’t forget the examples are interactive!
The upgrade
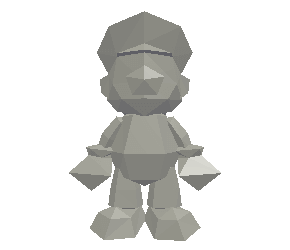
The famous Mario model which had to be stripped down due to polygon counting on the previous generation got completely redesigned for this one, take a closer look at how the model evolved from plain faces to wrinkled sleeves.

 Interactive model available in the modern edition
320 triangles.


 Interactive model available in the modern edition
4,718 triangles.
It’s really impressive how much detail has been gained in just two years, eh?
The update
In this case, Sonic Team already designed a Sonic model for their unique console, but after porting their game to the GameCube they found themselves able to add more polygons to their model, achieving better detail.


 Interactive model available in the modern edition
1,001 triangles.


 Interactive model available in the modern edition
1,993 triangles.
Creativity
As you can see from the inner working of this pipeline, graphics technology has been evolving to point that programmers can now take control of certain functions of the rendering process.

During the same time, PC graphics cards were starting to discard fixed-function pipelines in favour of shader cores (units that run small programs which define how pixels are operated). Flipper still contains a fixed-function GPU, however, by including components such as the TEV unit, one could argue that Nintendo provided their own shader-like solution.
I guess one of the best examples of games that exploited this new capability is The Legend of Zelda: Wind Waker which implements a unique colour/lighting technique known as Cel shading to make its textures look cartoonish.
Video output system
The video signal outputs a resolution of up to 640x480 pixels (or 768×576 px in PAL) with up to 16.7 million colours (24-bit depth). Additionally, the system could broadcast its signal in progressive mode (which has a clearer image, but not every TV may have supported it during that time).
The XFB can have multiple dimensions, so for compatibility reasons, the Video interface will try its best to display the frame by re-sampling the XFB to fit the TV screen based on the region.
Connections
The console included not one, but two video output connectors:

- One named Analog A/V which is actually the good-old Multi Out. This is the most popular one.
- The PAL version of this console doesn’t carry S-Video and the NTSC one doesn’t provide RGB (bummer!).
- Another one called Digital A/V which sends audio and video in digital form (similarly to HDMI nowadays but using a completely different protocol!).
- Nintendo released a component cable set that connected to this socket. The same plug incorporated a video DAC and encoder to convert the digital signal into YPbPr (optimal quality).
- The cable was sold as an extra accessory and now is considered some sort of a relic!
Audio
Nintendo finally delivered some dedicated audio circuitry to offload the huge task from the CPU-GPU and provide richer sounds. Their new solution is an independent Digital Signal Processor or ‘DSP’ manufactured by Macronix running inside Flipper.
The DSP’s job consists of performing different operations over our raw audio data (e.g. volume changes, sample rate conversion, 3D sound effects, filtering, echo, reverb, etc) and then output a 2-channel PCM signal. It doesn’t work alone however, the DSP delivers audio with the help of other components.
Its first companion is the Audio Interface (AI), a 16-bit stereo digital-to-analogue converter responsible for sending the final sample through the audio signal that ends on the TV. The AI can only process 32 bytes of audio data every 0.25ms, so if we take into account that each sound sample weights 2 bytes and we need two to create stereo sound, the AI will be able to mix up to eight stereo samples with up to 32 kHz of sampling rate, sound!
Finally, we have the Audio RAM (ARAM) block, which is a large (16 MB) but very slow spare memory that can be used to store raw sound data. There’s quite a lot of space, so the GPU can also use it to store additional material (like textures). The CPU doesn’t have direct access to this memory so it will resort to DMA to move content around.
For better or worse, the DSP is programmable with the use of microcode (yikes), but fear not, as the official SDK already bundles a general-purpose microcode that almost every game used, except on the console’s boot sequence and some Nintendo games (how convenient, as Nintendo didn’t document the DSP, so only they know how to program it).
That being said, the process of generating sound works as follows [22]:
- CPU commands DMA to move raw samples to ARAM.
- CPU sends a list of commands that instruct how the DSP should operate these samples. In other words, it uploads the microcode program (only one is officially available for developers).
- DSP fetches samples from ARAM, applies the required operations and mixes them into two channels. Finally, it stores the resulting data on RAM.
- AI fetches processed samples from RAM and outputs them through the audio signal.
Compression and freedom
While we’ve already reached the sampling age and we are not locked to specific waveforms anymore, the new sound system is still a huge improvement. For starters, the saga of forced music sequencing is gone for good. The system can now stream pre-produced music to the audio endpoint without problems, much like what the Saturn and PS1 accomplished years ago.
Let me show you an example using two games, one released for the Nintendo 64 and its sequel released for the GameCube. Both have different music scores but the context (enemy battle) is the same. Take a look at how both tracks differ in sound quality, taking into account the design of each system (shared vs dedicated).
Sequenced on the fly by the RSP.
Streamed to the DSP.
As you can hear, the DSP finally gave music composers the flexibility and richness they always asked for.
Additional material
For a more direct side-by-side comparison, I’ve prepared this interactive widget that shows how composers ended up adapting their arrangements for the GameCube and its predecessor. Here, the same upbeat score is utilised for a Nintendo 64 title and a GameCube one, and the resulting comparison allows me to demonstrate (once again) the technical advantages of the GameCube’s DSP.
Nintendo 64: Kirby 64: The Crystal Shards (2000).
GameCube: Kirby Air Ride (2003).
Now, to visualise what’s happening behind each track, here are the two respective spectrograms. Before I start, if you are not familiar with these kinds of charts, I recommend reading my previous NES article, in particular the audio section (where I introduced them).
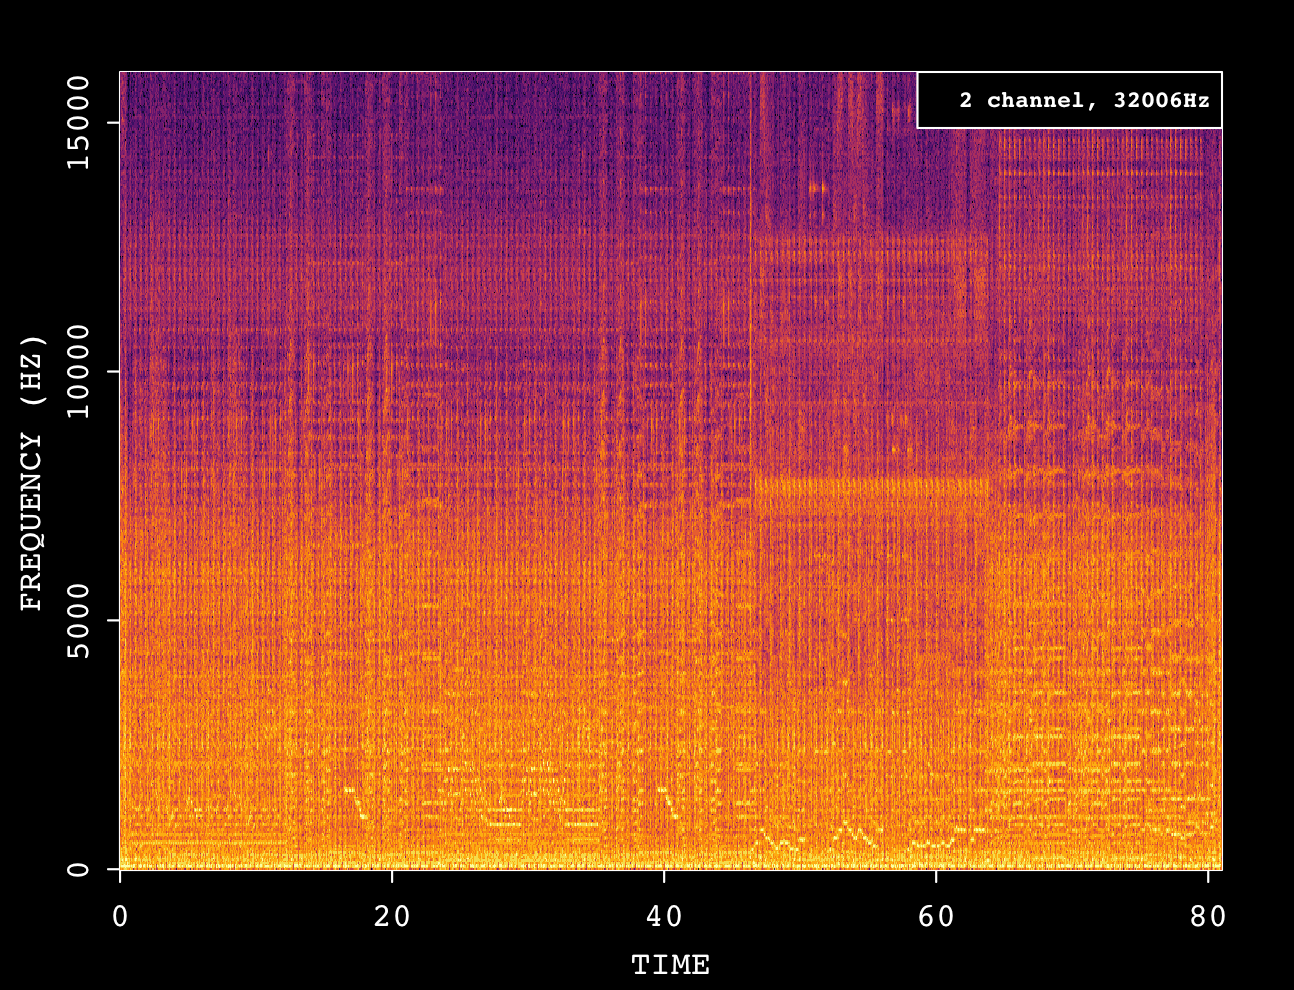

To be fair, mixed tracks are difficult to decompose in a spectrogram, but I believe I can attempt to deduce some patterns from it.
To begin with, almost all the frequency spectrum is being evenly utilised in the GameCube track, which may be attributed to the additional instruments used for accompaniment (which add harmonics and therefore fill more areas on the chart).
Finally, the amplitudes on the GameCube spectrogram look more uniformly distributed. In other words, the volume of each instrument is differently balanced and includes effects like reverb. I’m guessing the latter is what the composer originally intended while producing this score, and these types of controls are possible by the fact that the GameCube supports audio streaming. Thus, composers can use any tool of choice to sequence and mix their music, as opposed to strictly depending on the console (and its limitations) to sequence and mix at runtime.
I wouldn’t say that the Nintendo 64 is completely incapable of producing the same result. However, one thing for sure is that, in the world of the Nintendo 64, every single audio function costs extra cycles and/or memory, and this can have an impact on other areas of the game. Hence the need to ration resources. On the other hand, with the GameCube’s support for large samples, one can just stream the full produced score altogether.
I/O
It seems that this generation is putting a lot of work into expandability and accessories, the GameCube included a couple of new interesting ports, although some of them remained unused.
Internal I/O
Flipper is in charge of interfacing the CPU with the rest of the components so, apart from including sound and graphics circuitry, it also provides a collection of hardware named Northbridge that is composed of [23]:
- Audio Interface or ‘AI’: Connects the Audio Encoder.
- Video Interface or ‘VI’: Connects the Video Encoder.
- Processor Interface ‘PI’: Connects the CPU (Gekko).
- Disk Interface or ’DI: Connects the DVD controller, which can be considered an independent computer per se.
- Serial Interface or ‘SI’: Connects four possible controllers using a proprietary serial protocol.
- External Interface or ‘EXI’: Connects the external accessories (more explained below), Memory Card and the IPL BIOS along with the Real-Time Clock or ‘RTC’. It uses an SPI-like protocol to connect these devices using only one serial node.
Each interface exposes a set of registers to alter some of its behaviour.
Optional I/O
On the bottom of the GameCube’s case, you’ll find two external sockets to connect some widgets.
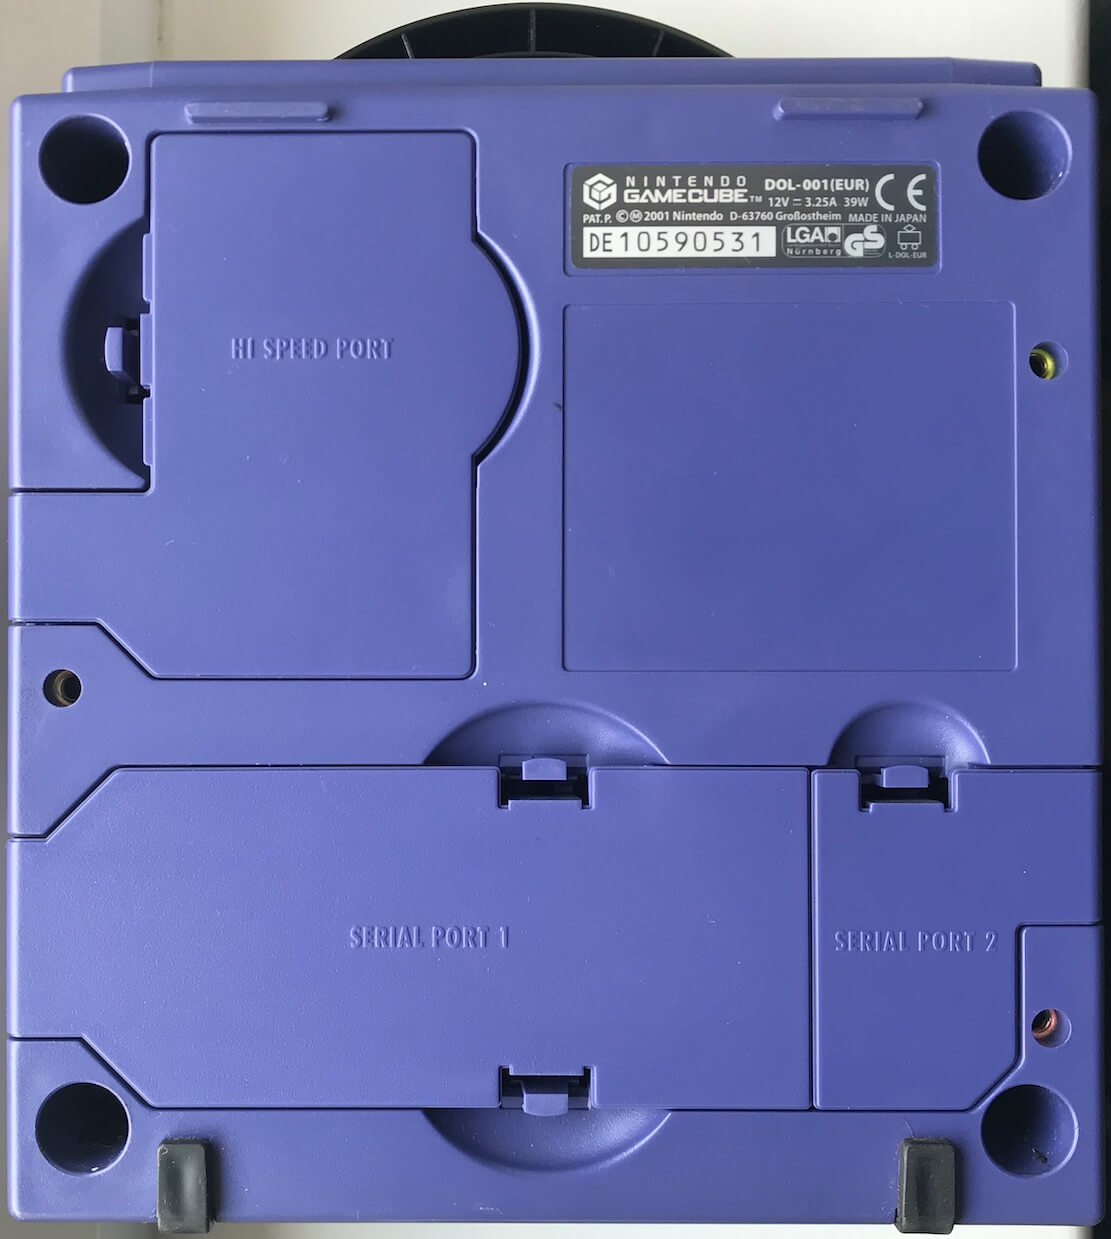

Both are technically identical (serial bus running at 32 MHz), yet they are presented with a distinct external shape to accommodate different accessories:
- Serial Port 1: Nintendo shipped Modem and Broadband adapters for this slot.
- Serial Port 2: No public accessory shipped using this port, but you may find some third-parties accessories that provided debugging tools.
These ports are operated on the EXI stack.
Unusual I/O
You’ll notice I still haven’t mentioned another available socket found next to the serial ports: The Parallel Port. This port happens to be much faster (8-bit at 80 MHz vs 1-bit at 32 MHz) which may be the reason Nintendo called it Hi-Speed Port. But the most unusual part is that this port is not interfaced through EXI, but through ARAM!
The only official accessory known to date is the famous Game Boy Player which plugged in as an extra floor under the GameCube, it contained the necessary hardware to natively play Game Boy and Game Boy Advance games. The Player works by doing all the heavy work itself and then sending the results (frames and audio data) to ARAM which the GameCube forwards to the respective components for display/sound.
Consistent design
I found it worth pointing out that no matter how many accessories you connect, the console will always keep its cubic shape (or at least attempt to).
Operating System
Upon turning on the console, the CPU will start loading an operating system called Dolphin OS found on the BIOS/IPL chip, this is a very minimal OS that will take care of initialising the hardware and providing some convenient system calls and global variables for games to use. Games developed using the official SDK will implicitly execute these calls during low-level operations.

Splash and shell
After finishing the boot process, the OS will load a small program unofficially called Main Menu.
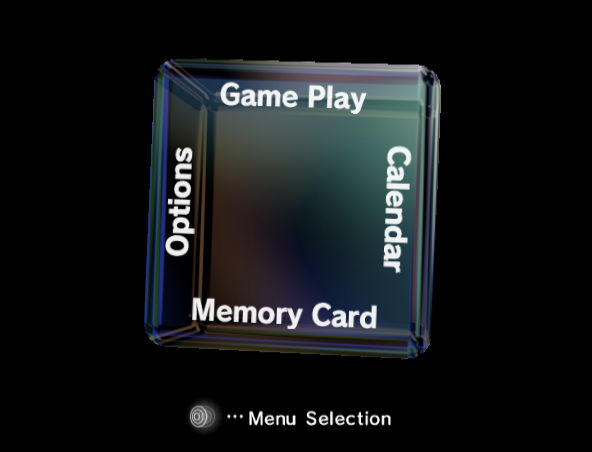
This program is responsible for displaying the famous splash animation (the wee cube drawing a GameCube logo) and loading the game if there is one inserted. In the absence of a valid game, it will then provide a simple cube-shaped menu with various options to choose from:
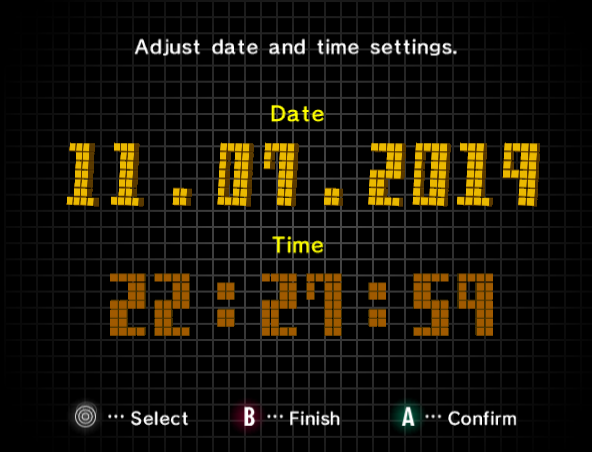
- Change Date and Clock.
- Load the game from the DVD reader.
- Manage saves on any Memory Card.
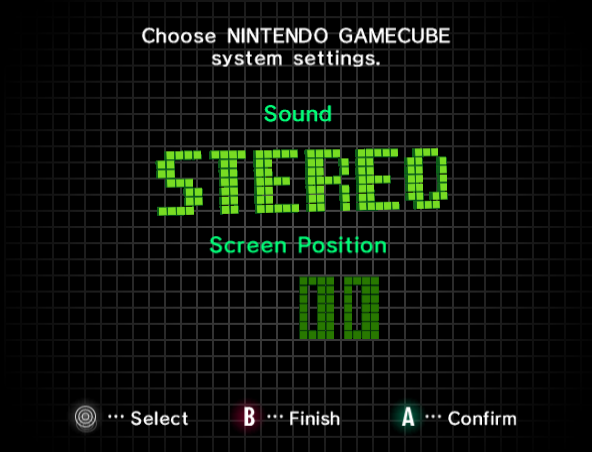
- Change sound settings and screen position.
Games
Nintendo provided developers with lots of tools to assist (and encourage) the development of games for their console [24]:
- Dolphin SDK: The official set of APIs and useful libraries. This includes the GX library in charge of programming Flipper’s GPU.
- C and C++ Compilers.
- Debuggers and Testers: Meant to be used with an official Dev Kit.
- Cygnus: Now known as ‘Cygwin’, it’s basically used to replicate the UNIX environment on Windows.
- CodeWarrior: A de-facto IDE back in the days.
- Various assistance tools such as MusyX, Texture editors, Display Lists exporters, USB programmers, etc.
- Tons and tons of documentation! (available in PDF and HTML)
Specialised hardware
Apart from the software, the company supplied different hardware kits (which range in price) before and after the console was publicly released.
Probably the most popular one worth mentioning is the Dolphin Development Hardware or ‘DDH’ which consisted of a PC-like tower containing some of the GameCube’s I/O and lots of dev-assisting hardware [25], it was mainly used as a debugging station while the game was being developed on a Windows PC.
Medium
Games are loaded from a proprietary disc called miniDVD, it’s almost half the size of a traditional DVD disc and can hold up to 1.4 GB of data.
As an interesting fact, the disc reader operates in a Constant Angular Velocity or ‘CAV’ meaning that its data will be read at a faster rate if its found in the outer area of the disc (3.125MB/s) and slower if it’s found in the inner area (2MB/s). This differs from Constant Linear Velocity systems (used by traditional CD/DVD readers) where the effects are the opposite.
Game saves are stored in a proprietary external accessory called Memory Card and there are enough slots for two of them.
Unusual controllers
Nintendo shipped an accessory known as the GameBoy Link Cable which plugged a Game Boy Advance into the GC controller port, so games could upload small programs to the GBA and treat it as a special controller. This interesting feature enabled unique interactions and content in some games.
Online Platform
Well, unlike the competition, not only did Nintendo require users to buy extra accessories to access online content, but they also didn’t deploy any internet service that publishers could rely on [26], making developers solely responsible for providing the necessary internet infrastructure.
As a result, while online gaming was a possible feature, it didn’t get widely adopted and only a tiny amount of games made use of this.
Anti-Piracy & Homebrew
Nintendo has been in this game for quite some time, so it’s no news that they included security mechanisms to prevent running unauthorised software or games from a different region. Furthermore, due to the new range of I/O that the GameCube provides, the attack surface got significantly larger.
Security mechanisms
We can organise them into these areas:
DVD controller
Even though this is the first Nintendo console to use the disc medium, attempting to play pirated copies of games just wasn’t going to be easy. The miniDVD is protected by using proprietary bar codes on the inner side of the disc, in addition to having its data encrypted. The validation and decryption process works seamlessly: The miniDVD controller takes care of it while the system is limited to only requesting the data.
The hardware composing the DVD reader can be imagined as a fortress wall which is only accessed using a series of commands, the miniDVD controller features a proprietary CPU that will take care of deciding if the inserted disc is genuine or not, and if it’s not, no command issued by the main CPU will convince to read it otherwise.
Defeat: As with any other cat-and-mouse game, it was just a matter of time before third-party companies successfully reverse-engineered the controller to build mod-chips that could trick the reader. But bear in mind that no mod-chip will make this console magically fit a conventional CD/DVD without physically altering the case!
IPL and EXI
Another possible path of exploitation consists of using the external I/O available to load Homebrew programs. Although, without cracking the DVD reader first, the only other option available is to try to take control of the first program that the GameCube loads, and that is… The IPL.
That means that by reversing engineering the BIOS and replacing the chip with a modified one, one would be able to run, let’s say, a file reader, and from there execute programs received from the accessory ports (assuming the additional hardware is plugged in).
Be as it may, the IPL chip is encrypted using XOR conditionals and a Cipher-text [27], making it ‘impossible’ to reverse engineer.
Defeat: Hackers eventually discovered that the hardware that handles the decryption of the IPL contained a bug that enabled them to capture the Cipher-text used [28]. With this, another ROM could be constructed and encrypted with the same cypher so the GameCube boots it as its own!
As if that wasn’t enough, hackers also found new methods to trick the miniDVD reader into loading conventional DVDs.
Honourable Mention
Before those two mechanisms were discovered, there was actually a much simpler way of loading arbitrary code without any modification whatsoever. This method consisted of hijacking the online protocol.
Some games like Phantasy Star Online implemented their own online functionality, which could be updated by downloading an updated executable (DOL file) from the company’s servers, and the latter didn’t implement any security in its protocol. So, as you can see, this was a man-in-the-middle attack waiting to happen…
Long story short, by spoofing a fake server the GameCube would just download (and execute) whatever DOL you could provide. That means hackers only needed the original game and the broadband adapter. This technique is known as PSOload [29].
That’s all folks

Well, this is it, the 10th article!
I really tried to set a rough limit on the length of this article but you have to understand, technology has gotten so complex that if I accidentally skip anything important, the whole topic gets impossible to follow.
Anyway, I’d like to thank the #dolphin-dev IRC community for helping me understand the complicated pipeline of Flipper’s GPU, these guys have been developing the GameCube emulator for quite some years now and it’s really impressive how much they had to put up with.
And finally, please consider contributing if you found it an interesting read. I strive to make it as complete as I can, and in the process, I forget how much time it’s suddenly costing me, I find it a good investment nonetheless.
Until next time!
Rodrigo.


